How to Write a Resume: The Complete Guide
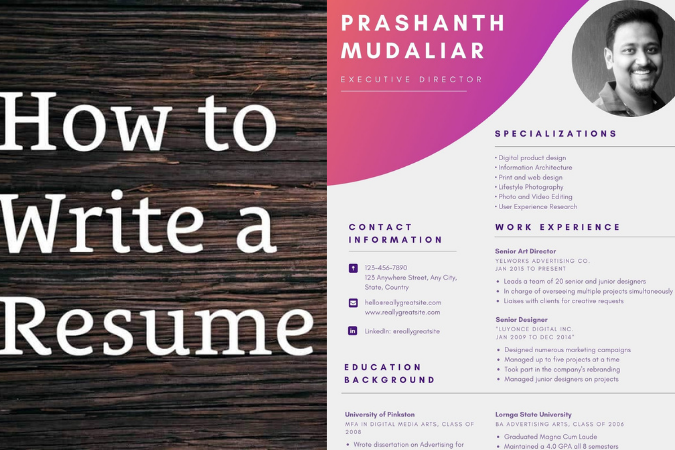
To help you on your job hunt, we’ve outlined how to write a resume in 10 easy-to-follow steps. From industry-specific formatting and writing suggestions to proper fonts and margins, we’re here to break it all down for you.
Are you ready to learn how to make a resume that lands you your dream job?
So you’re staring at a blank page on your computer wondering, “what exactly is a resume and how can I hope to put one together?” Thousands of people ask themselves these questions every day, and it’s because there’s no standard rule for putting together a resume.
We’re here to tell you that everything begins with your resume format.
To format your resume, begin by organizing all of your information into a resume outline. Outlining this information helps you identify your professional strengths and weaknesses, and quickly determine which parts of your work history to include.
With these details in order, you can then pick the resume format best for you.
There are three resume formats used by job seekers today: 1.) reverse-chronological, 2.) functional, and 3.) combination. Each format has advantages and disadvantages based on how the resume sections are arranged. Below, you’ll learn how to pick the format best for your own professional background.
This is the most traditional format, and what you’re most likely to encounter in the real world (as an applicant or hiring manager). Chronological resume formats are generally more flexible, and can be used by applicants with any level of experience.
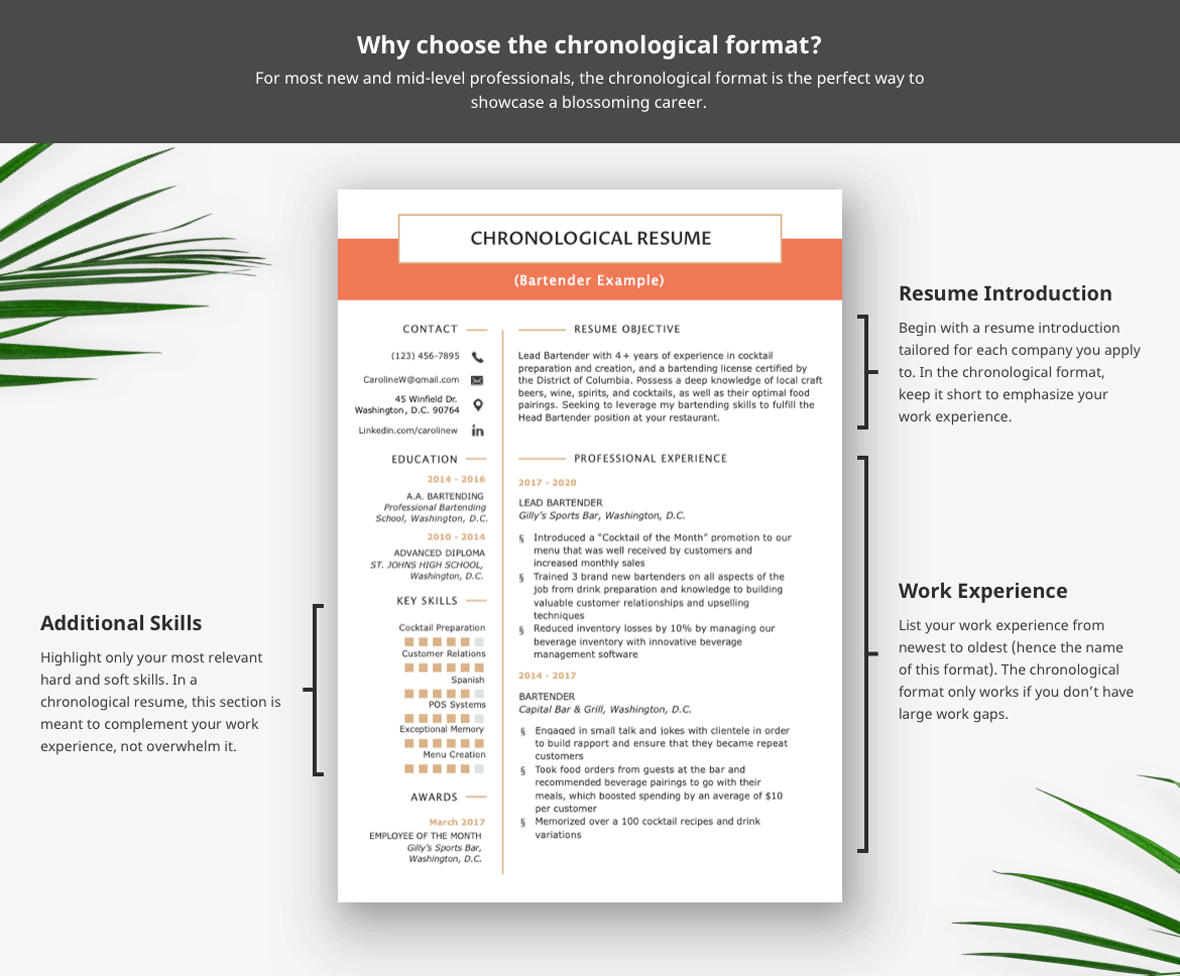
Details about the resume sections of this format:
I should use if:
I shouldn't use if:
While chronological resumes place emphasis on career progression, a functional resume is a skills-based resume. Since it heavily emphasizes an applicant’s qualifications, the functional format is more suitable for anyone with an expert level of experience.
The functional format has many of the same sections as the chronological, but with some key differences:

Details about the sections on this format:
I should use if:
I shouldn't use if:
The combination resume format combines elements of both the chronological and functional formats. Like the functional format, it focuses on specific qualifications, yet the body of the document contains professional experience similar to chronological format. This format is generally reserved for those with a great deal of experience in a particular industry.

Details about this format’s sections:
I should use if:
I shouldn’t use if:
Include the following details in your contact information section:
Here are three examples of how you can format your contact information section (pay attention to the yellow borders):
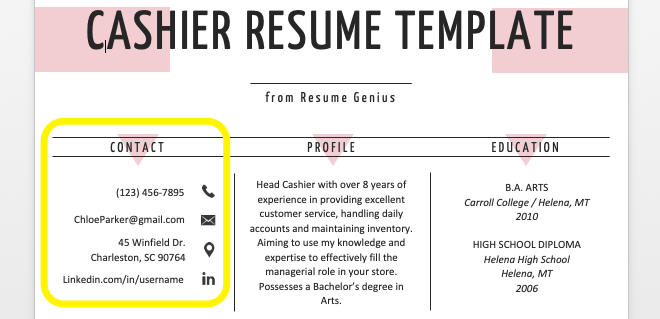
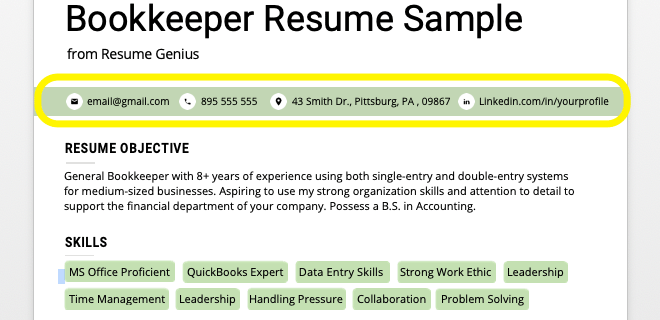
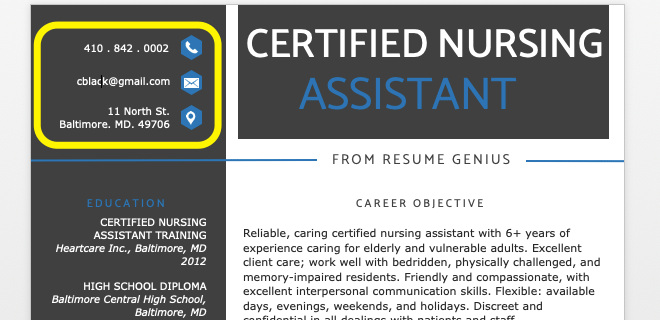
Also, be careful not to accidentally add the contact information in the resume header, as applicant tracking systems may not be able to read it.
There are four primary types of resume introductions used by job seekers today:
Resume introductions are all written with the same goal in mind: to gain the attention of a prospective employer by highlighting relevant skills and experience. However, the method (both in structure and content) used to achieve this goal differs based on the type of introduction.
A resume objective (or career objective) is a 2–3 sentence statement that provides an overview of your skills and experience. This intro is best for entry-level candidates.

I should use if:
I shouldn’t use if:
Resume summaries (sometimes referred to as “professional summaries”) include four to five bulleted sentences that highlight your past achievements by using numbers. Each sentence includes a bolded skill to make these numbers best stand out.
This type of introduction is good for job seekers with some experience and an idea of how to tie numbers into that experience.

I should use if:
I shouldn’t use if:
A summary of qualifications is a bullet-point list (ranging from 4 to 6 points) of your most outstanding career achievements.
This introduction is perfect for industry veterans with too many accomplishments to cover exclusively in a work experience section.

I should use if:
I shouldn’t use if:
The resume profile is a combination of both the career objective and qualifications summary. It’s also the most flexible introduction type because it can be formatted as a short paragraph or bullet-point list.

I should use if:
I shouldn’t use if:
Finally, when deciding what skills to add to either of the two, try to target skills specific to the job you are applying for. Just be wary of simply copy-pasting the skills right out of the job description (hiring managers might notice if it’s too obvious).
Instead, try to use resume words that are common in the industry.
This section is the most essential part of a resume for people with any on-the-job experience.
To create a logical and informative work experience section, list your relevant experience from most recent (at the top) to oldest (at the bottom). For each job title, create a heading including the company’s name, city and state, your title, and the dates of employment (month and year).
If you’re still currently working at a company, you can simply write “[month], [year]–present” for the employment dates.
A general rule is that each job title includes about 3–5 bullet points of your main duties and achievements working in that role.
3 parts of a strong bullet point:
Example 1:
Trained 5+ cashiers, managing their cash limits and guaranteeing quality customer service at all times.
Example 2: (Note that the Quantifiable Point does not need to come immediately after the action verb)
Spearheaded the development of the first media kit amalgamation for all company projects, increasing national sales by 8%.
One reason the above bullet points are effective is that they use action verbs to grab the attention of hiring managers. When you start writing about your own experiences, remember to write your action verbs in the past tense.
One strategy for making your experience section even better is to create it with a specific job advertisement/company in mind.
Finding certain key verbs and occupation-specific nouns inside the ad, then spreading them cleverly throughout your resume, is a great way to strike a chord with the hiring manager.
Check out the following marketing specialist posting (with green underlines for verbs and blue for nouns/skills)from Indeed.com:
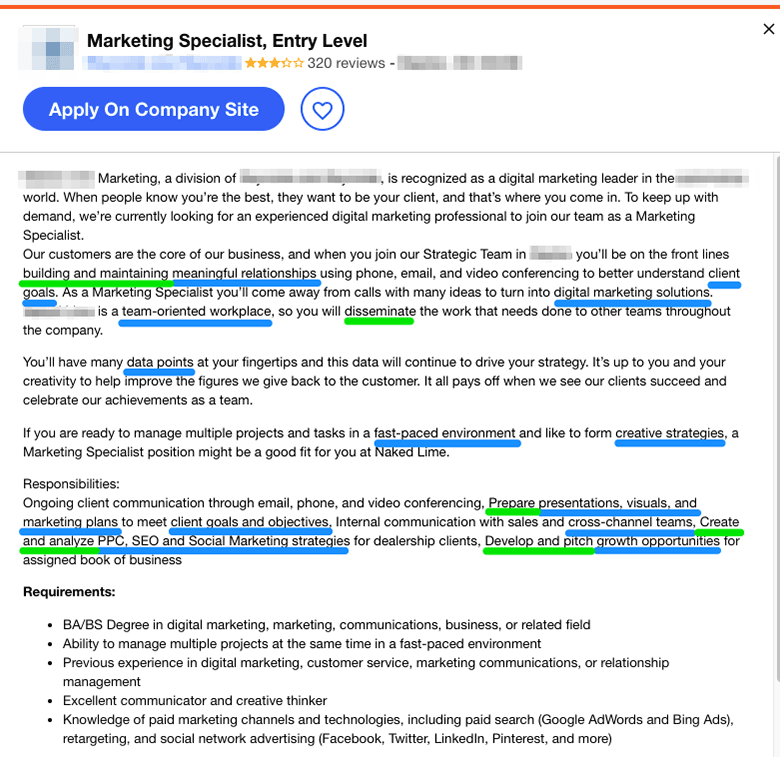
For an aspiring marketing specialist, there are several language cues spread throughout this advertisement. It’s up to the job seeker to capitalize on them.
Using the ad above, we’ve created three example experience bullets for a resume where the applicant has one year of relevant experience.
The example below demonstrates how to candidate strategically pepper the verbs and nouns/skills found in the job ad into your work experience section:
Taylord’s Marketing Firm, Reno, NV
July 2017 – August 2018
- Analyzed SEO data points using Google Analytics, prepared relevant presentations
- Pitched various digital marketing solutions to clients, with a 98% success rate
- Worked with cross-channel teams to develop creative marketing strategies, boosting sales 37% in one year
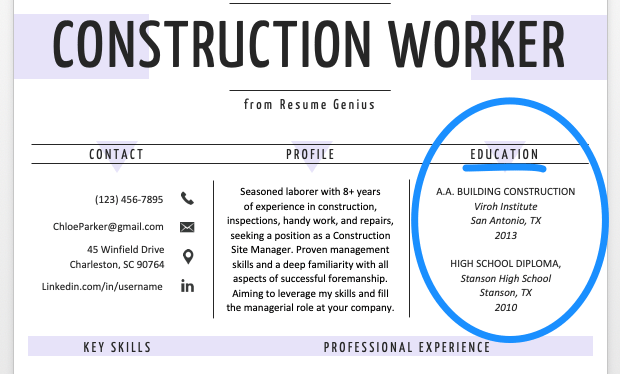
Having a clear education section helps you display the foundation of your knowledge and expertise to hiring managers, regardless of your background.
If you’re a college or high school student lacking professional experience, you can benefit from having a more filled-out education section. On the other hand, if you possess a wealth of professional experience, then it’s appropriate to keep this section short and sweet.
Here are the main points to include in a standard education section:
Here are three examples of how you can format an education section:


Hiring managers are on the lookout for skilled individuals. While listing a heap of skills on your resume doesn’t actually prove you’re skilled, spreading your various capabilities throughout your resume will catch the eye of whoever is vetting your application.
Fitting various skills into your resume’s introduction and even work experience section will help strengthen your candidacy. And of course, there’s your resume’s skills section for you to really dive in there depending on your field. But first:
To keep it concise: hard skills are concrete, quantifiable abilities. Language fluency, competency using computer programs, or being able to operate heavy machinery all count as types of hard skills. Here’s a list of 24 popular hard skills on a resume:
| Accounting Tools (SAP, Oracle, etc.) | SEO & SEM |
| HTML / CSS | UX / UI Design |
| Bookkeeping | Java Development |
| Business Intelligence | Mac, Linux, and Unix Systems |
| Perl / Python / Ruby | Vulnerability Analysis |
| Content Management Systems (CMS) | Data Engineering and Data Warehousing |
| Adobe Creative Suite | Database Management and Software |
| Cloud Apps (JSON, Rest, etc.) | Automotive Services |
| Statistical Analysis and Data Mining | Public Speaking |
| Foreign Languages | Software Development |
| Software QA and User Testing | Data Presentation |
| Web Architecture | Technical Reporting |
Soft skills, on the other hand, are more personality-centric traits. Things like being a team player, being driven to succeed, or having a great attitude all fall under this general umbrella. Below is a table of 24 soft skills that employers are on the lookout for:
| Organization | Self-motivation |
| Discipline | Responsibility |
| Logical reasoning | Open-mindedness |
| Persistence | Decision making |
| Initiative | Integrity |
| Commitment | Professionalism |
| Teamwork | Time Management |
| Empathy | Stress management |
| Patience | Cultural intelligence |
| Diplomacy | Trust |
| Focus | Versatility |
| Self-starter | Critical observation |
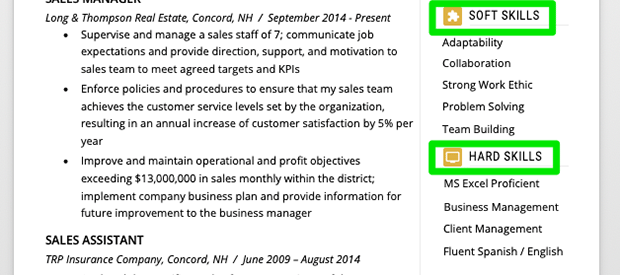
Here’s what including both types of skills on a resume might look like. Soft skills are underlined in blue, and hard skills are marked in red.
A great resume has a balance of both hard and soft skills. If you feel like you’re lacking in either and the above tables didn’t quite do it for you, we have a guide to the top ten hard skills employers love plus a giant list of soft skills for you to peruse at your leisure.
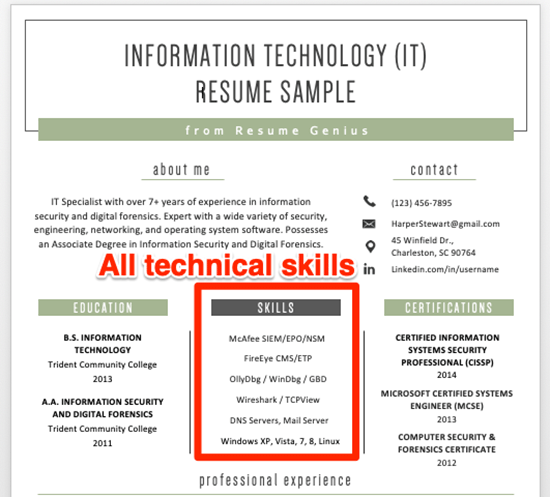
Some careers, such as those in the IT or engineering fields, require specialized technical skills.
Across the tech industry, the skills you need to succeed will differ from company to company. A technical skills section is helpful in showcasing your knowledge of certain systems, so that employers at a specific company can determine if you’re qualified (or not) for the job.
To prevent this section from taking up too much space, try breaking it up into categories and listing your skills within each. For example:
Check out our information technology (IT) applicant’s resume and note how their technical skills are at the front and center:
Skills sections are a standard part of every resume. They concisely highlight your strongest relevant talents, and employers will definitely look at what you include there (so don’t say you’re great at Microsoft Excel unless you actually are).
The most effective skills sections are a combination of hard and soft skills. Unlike a technical skills section which is only made up of hard skills, your skills section should incorporate a few of your strongest soft skills because they reflect on the type of employee you’d be if hired.
If you have a notable range of relevant hard and soft skills, feel free to break your skills section into hard and soft skills like this:
By now you’ve already added the nuts and bolts to your resume. Below are a few sections you may want to consider adding to help strengthen it.
Certifications and licenses are vital to list for some jobs and unimportant for others. For example, nursing has strict licensing requirements while customer service does not.
Just make sure you know which licenses and certifications to include in your resume before you send it off (if any), because leaving them out could ruin your application.

Adding a publications section is important for graduate students who have published articles relevant to the job they’re applying for. If you’re a published academic, list your articles in reverse chronological order by publishing date. Choose the referencing style that is appropriate to your discipline.
It’s also acceptable to add works that have yet to be published. You may label these as “Works in Progress” or “Submitted for Publication.” Here’s an example of how a publications section may appear in a resume.
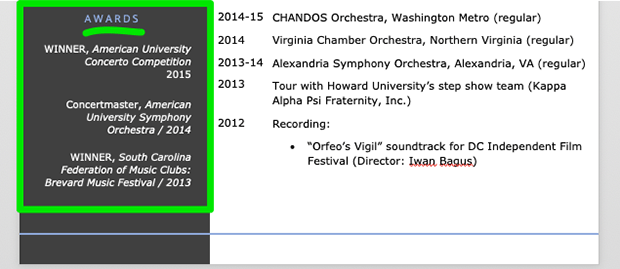
This section adds another layer of customization to your resume by providing evidence of your abilities. Adding relevant awards and accomplishments on your resume helps you stand out from your competition.
If this section becomes too lengthy, feel free to break them up into smaller sections. Here are some details to consider adding:
Whew! The hard part is over. You’ve written your resume, and are feeling confident about getting that interview. Now it’s time to take a moment and consider your resume’s design.
But first, let’s address one of the more controversial elements of writing a resume:
The short answer is one page. However, if you have substantial relevant work experience, it can be two or even three pages.
Just note that unless you’re applying for an upper-management position or an academic post, one page will be enough for hiring managers. Even Elon Musk’s resume (if he had to make one) could be tightened into one page.
If you are just adding fluff for the sake of adding pages, your resume will suffer.
Certain resume fonts are best suited for particular industries. There are general broad do’s and don’ts when it comes to choosing your font and sizes:
Font & Size Do's
Font & Size Don'ts
For sizing, many resumes follow a 24, 12, 10 format. This means that the name is 24 pt, the body headers are 12 pt, and the bullet points are 10 pt.
This is by no means a rule, but rather a guideline to consider following. Just remember to keep readability in mind when choosing font sizes. If the hiring manager needs to put on their glasses just to read your resume, then you might as well throw away your application yourself.
When choosing your font, the choice will come down to a “serif” style or a “sans serif” style. The major difference is that serif fonts have small lines on the ends of their letters, while sans serif (literally meaning “without” serif) does not. Again, the choice is based on your preference, and what you think will be the easiest for a potential employer to read.
Also think about whether you need to print out your resume or not. Serif fonts look sophisticated and clear on a paper resume, while electronic versions are easier to read in sans serif fonts.
Below are some popular font choices for both serif and sans serif styles:
| Serif Fonts | Sans Serif Fonts |
|---|---|
| Times New Roman | Calibri |
| Georgia | Tahoma |
| Bookman Old Style | Helvetica |
| Century Gothic | Arial |
Use lines to break up your resume and make it more readable. The first line break is usually placed after your resume introduction. From there, use lines to divide each subsequent section.
How you divide your resume is ultimately up to you, but just don’t go page-break crazy for every bit of information. Too many page breaks will hurt your resume’s readability.
Here are three examples of how you can implement lines into your resume:

Margins are one of the first things a potential employer will notice about your resume (especially if they’re too big or too small), so it’s important that they’re appropriately set.
One-inch margins are the safe bet for applicants that lack experience. If you have a lot of experience you need to fit on one page, then it’s acceptable to reduce your resume’s margins. Just don’t go below .5”, or your resume will look overcrowded.
Now that you know how to write your dream resume, you might be wondering: is a cover letter necessary? The answer is yes, always include a cover letter if you have the option.
Knowing how to write a good cover letter and then pairing one with your resume will round out your application and boost your chances of landing an interview.
Your cover letter gives you a chance to connect with a hiring manager on a deeper level than your resume does, and together these two crucial documents work in tandem to get you satisfying work. But be sure to check out our full list of cover letter tips when you write yours to guarantee you’re hitting all the right points.
Here’s an example of what a resume paired with a matching cover letter might look like (we think it looks pretty sharp):
Inspired? We have a boatload of free cover letter templates and matching resume templates for you to download if you’re in a hurry to get started.
You’ve already put the energy into learning how to write a great resume — there’s no reason to not put in some effort and make the best cover letter possible.
Once you’ve written your resume and cover letter, you’re in pretty good shape to send out that first application. However, you’re not quite done yet.
Even if you’re a Harvard-educated doctoral candidate or the state spelling bee champion, proofreading and editing your application documents can still save you from potentially embarrassing mistakes.
Read it over several times yourself at different times of the day to be sure everything is looking sharp. Something that sounded good the night before might not look as great in the morning once the sun comes up and you’re better rested.
Also, hand it off to a friend or family member who can give it a run-through. If they’re unable to decipher your resume and cover letter, it’s a good sign that you may need to make some adjustments.
While most hiring managers will be able to open a Microsoft Word document, it doesn’t hurt to also save your resume in PDF form as well.
You can also save copies on your computer, print off several for your own records, and even upload your documents to Google Drive. These precautions ensure that if anything suddenly happened to your computer, your hard work would be saved on the cloud.
Writing an effective email is an art form. If you can master it, you’ll be in high demand for a wide range of jobs related to assisting customers and clients.
It’s crucial that you don’t come off as overly polite, because it will make you sound insincere. However, you don’t want to appear cold or standoffish either.
There are four keys to writing an email that gets attention from hiring managers for the right reasons:
With a well-edited resume and cover letter locked down and an excellent application email drawn up, your job prospects are in a good place. Stay optimistic, and the hard work will pay off.